FastMRZ

⚡Extracting the Machine Readable Zone (MRZ) from passport or any document images
Miscellaneous
Fast MRZ

FastMRZ is an open-source Python package that extracts the Machine Readable Zone (MRZ) from passports and other documents. FastMRZ accepts various input formats such as Image, Base64 string, MRZ string, or NumPy array.
Features • Built With • Prerequisites • Installation • Example • Wiki • ToDo • Contributing
️✨Features
- 👁️Detects and extracts the MRZ region from document images
- ️🔍Contour detection to accurately identify the MRZ area
- 🎨Custom trained models using ONNX
- 🆗Contains checksum logics for data validation
- 📤Outputs the extracted MRZ region as text/json
🛠️Built With


🚨Prerequisites
- Install Tesseract OCR engine. And set
PATHvariable with the executable and ensure that tesseract can be reached from the command line.
⚙️Installation
-
Install
fastmrzpip install fastmrzThis can be done through conda too if you prefer.
conda create -n fastmrz tesseract -c conda-forge conda activate fastmrz -
Copy the
mrz.traineddatafile from thetessdatafolder of the repository into thetessdatafolder of the Tesseract installation on YOUR MACHINE
💡Example
from fastmrz import FastMRZ
import json

fast_mrz = FastMRZ()
# Pass file path of installed Tesseract OCR, incase if not added to PATH variable
# fast_mrz = FastMRZ(tesseract_path=r'/opt/homebrew/Cellar/tesseract/5.3.4_1/bin/tesseract') # Default path in Mac
# fast_mrz = FastMRZ(tesseract_path=r'C:\\Program Files\\Tesseract-OCR\\tesseract.exe') # Default path in Windows
passport_mrz = fast_mrz.get_details("../data/passport_uk.jpg", include_checkdigit=False)
print("JSON:")
print(json.dumps(passport_mrz, indent=4))

print("\n")

passport_mrz = fast_mrz.get_details("../data/passport_uk.jpg", ignore_parse=True)
print("TEXT:")
print(passport_mrz)
OUTPUT:
JSON:
{
    "mrz_type": "TD3",
    "document_code": "P",
    "issuer_code": "GBR",
    "surname": "PUDARSAN",
    "given_name": "HENERT",
    "document_number": "707797979",
    "document_number_checkdigit": "2",
    "nationality_code": "GBR",
    "birth_date": "1995-05-20",
    "sex": "M",
    "expiry_date": "2017-04-22",
    "optional_data": "",
    "mrz_text": "P<GBRPUDARSAN<<HENERT<<<<<<<<<<<<<<<<<<<<<<<\n7077979792GBR9505209M1704224<<<<<<<<<<<<<<00",
    "status": "SUCCESS"
}


TEXT:
P<GBRPUDARSAN<<HENERT<<<<<<<<<<<<<<<<<<<<<<<
7077979792GBR9505209M1704224<<<<<<<<<<<<<<00
📃Wiki
MRZ Types & Format
The standard for MRZ code is strictly regulated and has to comply with Doc 9303. Machine Readable Travel Documents published by the International Civil Aviation Organization.
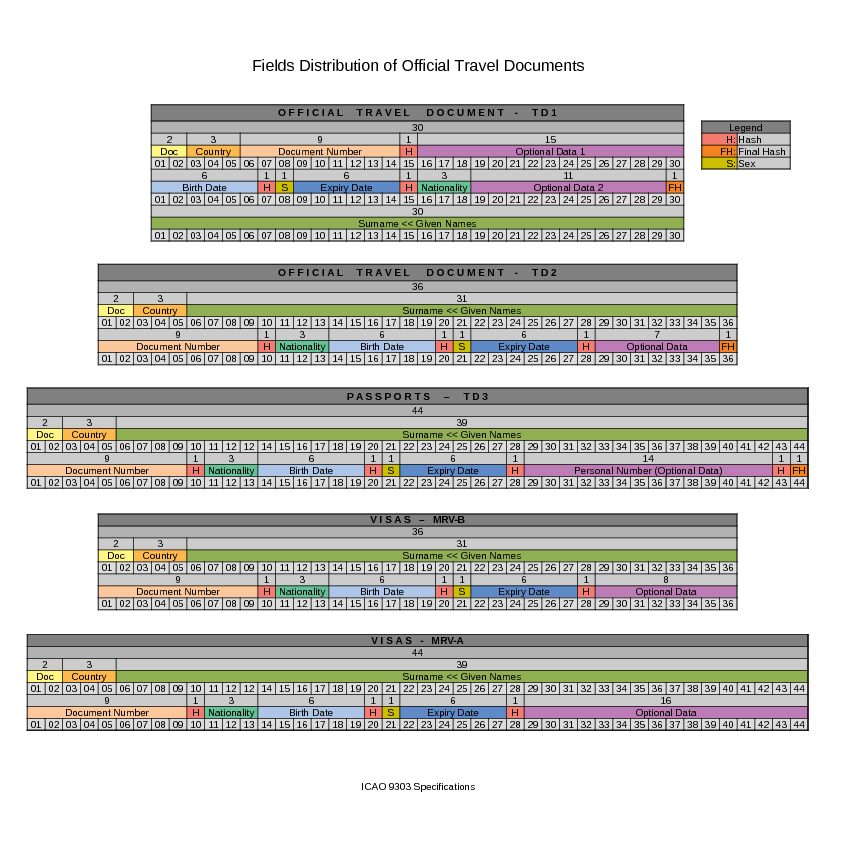
There are currently several types of ICAO standard machine-readable zones, which vary in the number of lines and characters in each line:
- TD-1 (e.g. citizen’s identification card, EU ID card, US Green Card): consists of 3 lines, 30 characters each.
- TD-2 (e.g. Romania ID, old type of German ID), and MRV-B (machine-readable visas type B — e.g. Schengen visa): consists of 2 lines, 36 characters each.
- TD-3 (all international passports, also known as MRP), and MRV-A (machine-readable visas type A — issued by the USA, Japan, China, and others): consist of 2 lines, 44 characters each.
Now, based on the example of a national passport, let us take a closer look at the MRZ composition.


✅ToDo
- Include mrva and mrvb documents
- Add wiki page
- Support numpy array as input
- Support mrz text as input
- Support base64 as input
- Support pdf as input
- Function to return mrz text as output
- Bulk process
- Add function parameter - Image Enhancement Model
- Add function parameter - Text Image Enhancement Model
- Train Tesseract model with additional data
- Add function parameter - include_checkdigit
- Add function - get_mrz_image
- Add function - validate_mrz
- Add function - generate_mrz
- Extract face image
- Add documentation page
- Add all checkdigit status
🤝 Contributing
Contributions are welcome! Here's how you can help:
- Fork the repository
- Create a new branch (
git checkout -b feature/amazing-feature) - Make your changes
- Commit your changes (
git commit -m 'feat: add amazing feature') - Push to the branch (
git push origin feature/amazing-feature) - Open a Pull Request
⚖️License
Distributed under the AGPL-3.0 License. See LICENSE for more information.
🙏Show your support
Give a ⭐️ if this project helped you!
🚀Who's Using It?
We’d love to know who’s using fastmrz! If your company or project uses this package, feel free to share your story. You can:
- Open an issue with the title "We are using fastmrz!" and include your project or company name.
Thank you for supporting fastmrz! 🤟


